<< Chapter < Page Chapter >> Page >

Learning objectives

By the end of this section, you will be able to:

  • Calculate current that produces a magnetic field.
  • Use the right-hand rule 2 to determine the direction of current or the direction of magnetic field loops.

The information presented in this section supports the following AP® learning objectives and science practices:

  • 2.D.2.1 The student is able to create a verbal or visual representation of a magnetic field around a long straight wire or a pair of parallel wires. (S.P. 1.1)
  • 3.C.3.1 The student is able to use right-hand rules to analyze a situation involving a current-carrying conductor and a moving electrically charged object to determine the direction of the magnetic force exerted on the charged object due to the magnetic field created by the current-carrying conductor. (S.P. 1.4)
  • 3.C.3.2 The student is able to plan a data collection strategy appropriate to an investigation of the direction of the force on a moving electrically charged object caused by a current in a wire in the context of a specific set of equipment and instruments and analyze the resulting data to arrive at a conclusion. (S.P. 4.2, 5.1)

How much current is needed to produce a significant magnetic field, perhaps as strong as the Earth’s field? Surveyors will tell you that overhead electric power lines create magnetic fields that interfere with their compass readings. Indeed, when Oersted discovered in 1820 that a current in a wire affected a compass needle, he was not dealing with extremely large currents. How does the shape of wires carrying current affect the shape of the magnetic field created? We noted earlier that a current loop created a magnetic field similar to that of a bar magnet, but what about a straight wire or a toroid (doughnut)? How is the direction of a current-created field related to the direction of the current? Answers to these questions are explored in this section, together with a brief discussion of the law governing the fields created by currents.

Magnetic field created by a long straight current-carrying wire: right hand rule 2

Magnetic fields have both direction and magnitude. As noted before, one way to explore the direction of a magnetic field is with compasses, as shown for a long straight current-carrying wire in [link] . Hall probes can determine the magnitude of the field. The field around a long straight wire is found to be in circular loops. The right hand rule 2 (RHR-2) emerges from this exploration and is valid for any current segment— point the thumb in the direction of the current, and the fingers curl in the direction of the magnetic field loops created by it.
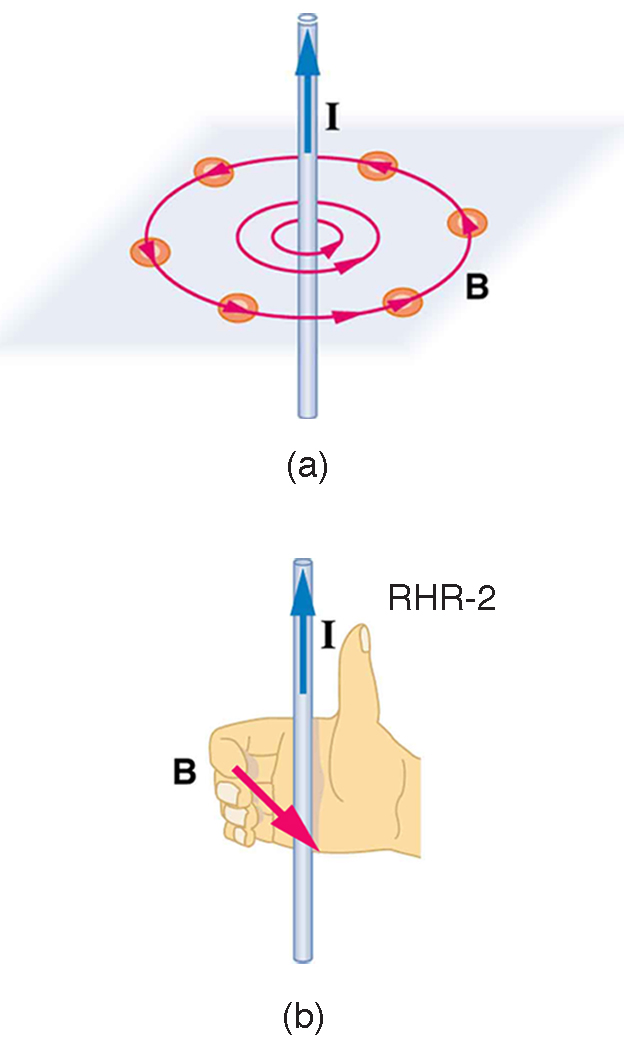
Figure a shows a vertically oriented wire with current I running from bottom to top. Magnetic field lines circle the wire counter-clockwise as view from the top. Figure b illustrates the right hand rule 2. The thumb points up with current I. The fingers curl around counterclockwise as viewed from the top.
(a) Compasses placed near a long straight current-carrying wire indicate that field lines form circular loops centered on the wire. (b) Right hand rule 2 states that, if the right hand thumb points in the direction of the current, the fingers curl in the direction of the field. This rule is consistent with the field mapped for the long straight wire and is valid for any current segment.

Making connections: notation

For a wire oriented perpendicular to the page, if the current in the wire is directed out of the page, the right-hand rule tells us that the magnetic field lines will be oriented in a counterclockwise direction around the wire. If the current in the wire is directed into the page, the magnetic field lines will be oriented in a clockwise direction around the wire. We use to indicate that the direction of the current in the wire is out of the page, and for the direction into the page.
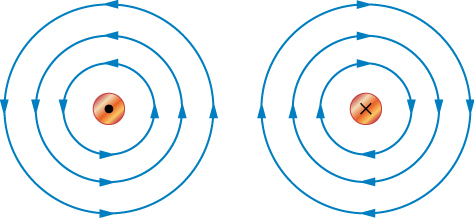
The diagram on the left shows a small circle with a dot in the center. There are three progressively larger circles on the outside of the small circle with arrows pointing in the counter-clockwise direction representing magnetic fields. The diagram on the right has a small circle with an x in the middle. The three progressively larger circles have arrows pointing in the clockwise direction.
Two parallel wires have currents pointing into or out of the page as shown. The direction of the magnetic field in the vicinity of the two wires is shown.
Practice Key Terms 9

Get Jobilize Job Search Mobile App in your pocket Now!

Get it on Google Play Download on the App Store Now


Source:  OpenStax, College physics for ap® courses. OpenStax CNX. Nov 04, 2016 Download for free at https://legacy.cnx.org/content/col11844/1.14
Google Play and the Google Play logo are trademarks of Google Inc.

Notification Switch

Would you like to follow the 'College physics for ap® courses' conversation and receive update notifications?

Ask